In this Spring Boot with JSP as view example we’ll see how to use JSP as a view with Spring Boot and what extra configuration is needed to do that.
First thing to do is to select packaging as “war” while creating Maven project.
If you are using STS then while creating new Spring starter project, choose packaging as war in “New Spring Starter Project”.
If you are using eclipse then choose a webapp project in the archetype selection while creating Maven project.
See example of creating Spring Boot application using STS here- Spring Boot Example Using Spring Tool Suite (STS)
Starter dependencies that are needed-
- spring-boot-starter-web
- spring-boot-starter-tomcat
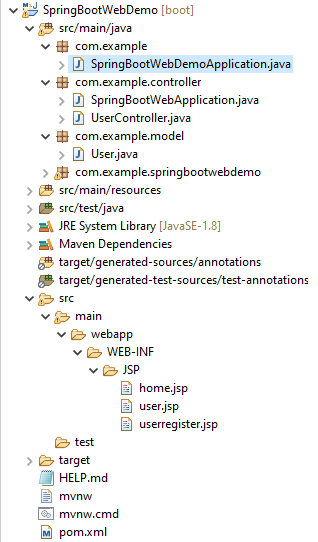
Project structure
Project structure for this Spring Boot JSP example should be as given below.
Maven – pom.xml
pom.xml should have the given dependencies. Following dependency is needed for compiling the JSP files.
<dependency>
	<groupId>org.apache.tomcat.embed</groupId>
	<artifactId>tomcat-embed-jasper</artifactId>
	<scope>provided</scope>
</dependency>

<?xml version="1.0" encoding="UTF-8"?>
  <project xmlns="http://maven.apache.org/POM/4.0.0" xmlns:xsi="http://www.w3.org/2001/XMLSchema-instance"
  xsi:schemaLocation="http://maven.apache.org/POM/4.0.0 https://maven.apache.org/xsd/maven-4.0.0.xsd">
  <modelVersion>4.0.0</modelVersion>
  <parent>
    <groupId>org.springframework.boot</groupId>
    <artifactId>spring-boot-starter-parent</artifactId>
    <version>2.2.2.RELEASE</version>
    <relativePath/> <!-- lookup parent from repository -->
  </parent>
  <groupId>com.example</groupId>
  <artifactId>springbootwebdemo</artifactId>
  <version>0.0.1-SNAPSHOT</version>
  <packaging>war</packaging>
  <name>SpringBootWebDemo</name>
  <description>Demo project for Spring Boot</description>

  <properties>
    <java.version>1.8</java.version>
  </properties>

  <dependencies>
    <dependency>
      <groupId>org.springframework.boot</groupId>
      <artifactId>spring-boot-starter-web</artifactId>
    </dependency>

    <dependency>
      <groupId>org.springframework.boot</groupId>
      <artifactId>spring-boot-starter-tomcat</artifactId>
      <scope>provided</scope>
    </dependency>
     <!-- To compile JSP files -->
    <dependency>
      <groupId>org.apache.tomcat.embed</groupId>
      <artifactId>tomcat-embed-jasper</artifactId>
      <scope>provided</scope>
    </dependency>

    <dependency>
      <groupId>javax.servlet</groupId>
      <artifactId>jstl</artifactId>
    </dependency>
    <dependency>
      <groupId>org.springframework.boot</groupId>
      <artifactId>spring-boot-starter-test</artifactId>
      <scope>test</scope>
      <exclusions>
        <exclusion>
          <groupId>org.junit.vintage</groupId>
          <artifactId>junit-vintage-engine</artifactId>
        </exclusion>
      </exclusions>
    </dependency>
  </dependencies>

  <build>
    <plugins>
      <plugin>
        <groupId>org.springframework.boot</groupId>
        <artifactId>spring-boot-maven-plugin</artifactId>
      </plugin>
    </plugins>
  </build>
</project>
Spring Boot MVC - JSP files
In the example these are 3 JSP files.
- home.jsp- Landing page which gives the link to start the user registration process.
- userregister.jsp- JSP with input box to enter data for the user which is bound to a user object.
- user.jsp- Displays the user data using the user object which is bound in previous “userregister” page.
home.jsp
<%@ page language="java" contentType="text/html; charset=ISO-8859-1"
    pageEncoding="ISO-8859-1"%>
<!DOCTYPE html>

<html>
<head>
<meta charset="ISO-8859-1">
<title>Spring BOOT MVC Example - Home JSP</title>
</head>
<body>
<body>
  <div>${message}</div>
  <a href="/registerUser">Register User</a>
</body>
</body>
</html>
userregister.jsp
<%@ page language="java" contentType="text/html; charset=ISO-8859-1"
    pageEncoding="ISO-8859-1"%>
<%@taglib uri="http://www.springframework.org/tags/form" prefix="form"%>
<!DOCTYPE html>
<html>
<head>
<meta charset="ISO-8859-1">
<title>User Registration</title>
</head>
<body>
  <!-- Values entered here are bound to the properties of
      user object assigned here to modelAttribute -->
  <form:form action="/showUser" modelAttribute="user" method="post">
    <table>
      <tr>
        <td>
          <form:label path="firstName">First Name</form:label>
        </td>
        <td>
          <form:input path="firstName" id="firstname" />
        </td>
      </tr>
      <tr>
        <td>
          <form:label path="lastName">Last Name</form:label>
        </td>
        <td>
          <form:input path="lastName" id="lastname" />
        </td>
      </tr>
      <tr>
        <td><input type="submit" value="Submit"></td>
      </tr>
    </table>
  </form:form>
</body>
</html>
user.jsp
<%@ page language="java" contentType="text/html; charset=ISO-8859-1"
    pageEncoding="ISO-8859-1"%>
<!DOCTYPE html>
<html>
<head>
<meta charset="ISO-8859-1">
<title>User Data</title>
</head>
<body>
<table>
<tr>
<td>First Name: ${User.firstName}</td>
</tr>
<tr>
<td>Last Name: ${User.lastName}</td>
</tr>
</table>
</body>
</html>
Spring Boot MVC - Controller class
UserController.java file which specifies URL mapping to methods.
import org.springframework.stereotype.Controller;
import org.springframework.ui.Model;
import org.springframework.web.bind.annotation.GetMapping;
import org.springframework.web.bind.annotation.ModelAttribute;
import org.springframework.web.bind.annotation.RequestMapping;
import org.springframework.web.bind.annotation.RequestMethod;
import com.example.model.User;

@Controller
@RequestMapping(value = "/")
public class UserController {
  @GetMapping("/register")
  public String showHome(Model model) {
    model.addAttribute("message", "Spring Boot MVC Example");
    return "home";
  }

  @RequestMapping(value = "/registerUser", method = RequestMethod.GET)
  public String registerUser(Model model) {
    // Add new user to model to be bound with view (JSP)
    model.addAttribute(new User());
    return "userregister";
  }

  @RequestMapping(value = "/showUser", method = RequestMethod.POST)
  public String showUser(@ModelAttribute("user") User user, Model model) {
    model.addAttribute("User", user);
    return "user";
  }
}
Spring Boot application class
Application class with main method extends SpringBootServletInitializer class and overrides its configure method.
SpringBootServletInitializer is an opinionated WebApplicationInitializer to run a SpringApplication from a traditional WAR deployment. It binds Servlet, Filter and ServletContextInitializer beans from the application context to the server.
To configure your web application you need to override the configure(SpringApplicationBuilder) method.
import org.springframework.boot.SpringApplication;
import org.springframework.boot.autoconfigure.SpringBootApplication;
import org.springframework.boot.builder.SpringApplicationBuilder;
import org.springframework.boot.web.servlet.support.SpringBootServletInitializer;

@SpringBootApplication
public class SpringBootWebDemoApplication extends SpringBootServletInitializer{
  @Override
  protected SpringApplicationBuilder configure(SpringApplicationBuilder application) {
    return application.sources(SpringBootWebDemoApplication.class);
  }
  public static void main(String[] args) {
    SpringApplication.run(SpringBootWebDemoApplication.class, args);
  }
}
Configuring view resolver
To resolver view to the JSP file you can configure InternalResourceViewResolver in the application.properties as given below.
application.properties
spring.mvc.view.prefix: /WEB-INF/JSP/
spring.mvc.view.suffix: .jsp
Running the application
You can run the application by executing the SpringBootWebDemoApplication class which has the main method.
Once the application has successfully started you can access the application using the URL’s as per the controller mapping.
http://localhost:8080/register
http://localhost:8080/registerUser
http://localhost:8080/showUser
That's all for the topic Spring Boot With JSP Example. If something is missing or you have something to share about the topic please write a comment.
You may also like


No comments:
Post a Comment