Node.js is a popular run time environment for executing JavaScript applications. If you are using popular JS frameworks like Angular, React then also it is required that you should have Node.js installed on your system. In this tutorial we’ll see how to download and install Node.js and NPM (Node Package Manager) on a Windows system.
Installing Node.js and NPM on windows
1. Downloading Node.js installer
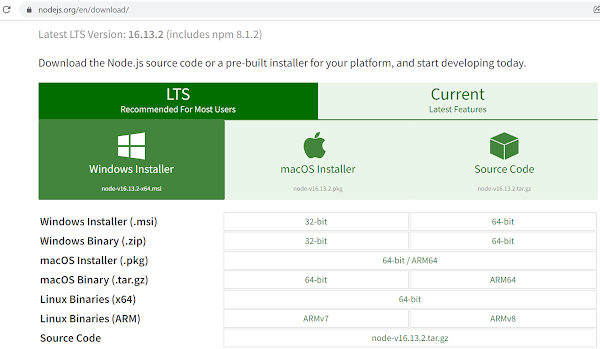
You can download Node.js from this location- https://nodejs.org/en/download/
Once you are on the page select one of the two choices LTS or Current. Better to opt for LTS (Long Term Support) version. Click on Windows Installer which will download the .msi file at the selected location in your system.
2. Installing Node.js and NPM
Once the .msi file is downloaded navigate to the location where it is downloaded and double click the installer to start the installation.
Click next to start the Node.js setup wizard and follow the instructions-
- Review the license agreement. Accept the terms (if you are ok with them) and click next.
- Select the location where you want to install Node. You can safely go with the default location unless until you want to install it at a specific location.
- You will get a screen with check box to automatically install tools for native modules. By default, option is not selected and you can go with that option itself if you don't need these modules.
- Click install button to start installation.
Check for NPM
NPM comes bundled with the Node.js installation so you don’t need any extra steps to install NPM. You can verify whether NPM is properly installed or not by checking the version. Run the following command from command prompt.
npm -v
Verifying Node.js installation
Same way you can also verify Node.js installation by running the following command which displays the installed Node.js version.
Node -v
Node.js Hello World program
You can also write a small Java Script program to run with Node.js to check if everything is working fine after installation.
Save the following code as HelloWorld.js
const http = require('http');

const hostname = '127.0.0.1';
const port = 9010;

http.createServer((req, res) => {
  res.statusCode = 200;
  res.setHeader('Content-Type', 'text/plain');
  res.end('Hello World From Node.js');
}).listen(port, hostname, () => {
  console.log(`Server running at http://${hostname}:${port}/`);
});
Navigate to the location where you have saved this JS file and run the following command to run the script which starts the server listening at port 9010.
D:\knpcode >node HelloWorld.js
Server running at http://127.0.0.1:9010/
Open a web browser and type the URL- http://127.0.0.1:9010/
That's all for the topic Installing Node.js and NPM on Windows. If something is missing or you have something to share about the topic please write a comment.
You may also like


No comments:
Post a Comment