March 31, 2022

Read PDF in Java Using iText

In this post we’ll see a Java program to read PDF document using iText library.

To know more about iText library and PDF examples check this post- Generating PDF in Java Using iText Tutorial

Reading PDFs using iText

For reading PDF using iText you need to use the following steps.

  1. Create a PDFReader instance, wrap it with in a PDFDocument.
  2. Get the number of pages in the PDF that has to be read.
  3. Iterate through pages and extract the content of each page using PdfTextExtractor.

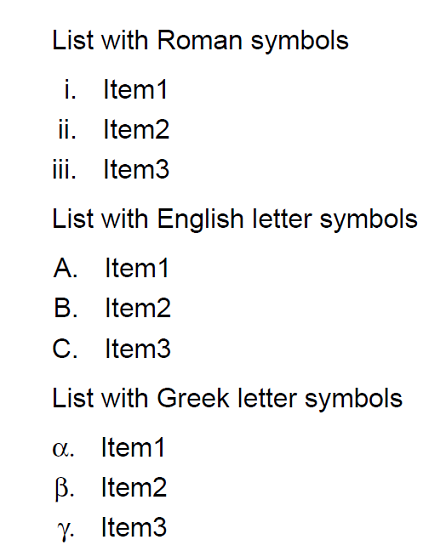
PDF used for reading.

List Items iText

Java Program

import java.io.IOException;
import com.itextpdf.kernel.pdf.PdfDocument;
import com.itextpdf.kernel.pdf.PdfReader;
import com.itextpdf.kernel.pdf.canvas.parser.PdfTextExtractor;

public class ReadPDF {
  public static final String READ_PDF = "F://knpcode//result//List.pdf";
  public static void main(String[] args) {
  try {
    // PDFReader
    PdfReader reader = new PdfReader(READ_PDF);
    PdfDocument pdfDoc = new PdfDocument(reader);
    // get the number of pages in PDF
    int noOfPages = pdfDoc.getNumberOfPages();
    System.out.println("Extracted content of PDF---- ");
    for(int i = 1; i <= noOfPages; i++) {
      // Extract content of each page
      String contentOfPage = PdfTextExtractor.getTextFromPage(pdfDoc.getPage(i));
      System.out.println(contentOfPage );
    }
    pdfDoc.close();
    }catch (IOException e) {
      System.out.println("Exception occurred " + e.getMessage());
    }
  }
}
Output
Extracted content of PDF---- 
List with Roman symbols
i. Item1
ii. Item2
iii. Item3
List with English letter symbols
A. Item1
B. Item2
C. Item3
List with Greek letter symbols
a. Item1
ß. Item2
?. Item3

That's all for the topic Read PDF in Java Using iText. If something is missing or you have something to share about the topic please write a comment.


You may also like
March 30, 2022

Merging PDFs in Java Using iText

In this post we’ll see a Java program to merge two PDF documents using iText library.

To know more about iText library and PDF examples check this post- Generating PDF in Java Using iText Tutorial

Merging PDFs using iText

In iText there is a PDFMerger class that can be used for merging PDFs. Using this class you can merge a number of existing documents into one.

Following Java program shows how two PDF documents can be merged using iText.

import java.io.IOException;
import com.itextpdf.kernel.pdf.PdfDocument;
import com.itextpdf.kernel.pdf.PdfReader;
import com.itextpdf.kernel.pdf.PdfWriter;
import com.itextpdf.kernel.utils.PdfMerger;

public class MergePDF {
  public static final String SRC_PDF1 = "F://knpcode//PDF1.pdf";
  public static final String SRC_PDF2 = "F://knpcode//PDF2.pdf";
  public static final String MERGED_PDF = "F://knpcode//result//Merged.pdf";
  public static void main(String[] args) throws IOException{
    PdfDocument pdfDoc = new PdfDocument(new PdfWriter(MERGED_PDF));               
    PdfMerger merger = new PdfMerger(pdfDoc);
    PdfDocument PDF1 = new PdfDocument(new PdfReader(SRC_PDF1));
    PdfDocument PDF2 = new PdfDocument(new PdfReader(SRC_PDF2));
    merger.merge(PDF1, 1, PDF1.getNumberOfPages());
    merger.merge(PDF2, 1, PDF2.getNumberOfPages());
	       
    PDF1.close();
    PDF2.close();
    pdfDoc.close();
  }
}

That's all for the topic Merging PDFs in Java Using iText. If something is missing or you have something to share about the topic please write a comment.


You may also like

March 29, 2022

Generating PDF in Java Using iText Tutorial

This iText tutorial shows how to generate PDF in Java using iText.

Before going to examples of PDF creation in Java using iText there are few points about iText library.

  1. iText (https://itextpdf.com) comes with dual licenses commercial as well as open source (AGPL). If you are using AGPL license (which is free) you need to share your entire application for free under the same AGPL license.
  2. The examples shown in this post use iText 7 library which is rewritten and API differs from iText 5.
  3. Some of the main classes that are used for generating PDF using iText are-
    • Document- Document is the default root element when creating a self-sufficient PDF.
    • PDFDocument- Main enter point to work with PDF document.
    • Paragraph- Creates a Paragraph, initialized with a piece of text.
    • Text- A Text is a piece of text of any length.
    • PdfWriter- Create a PdfWriter writing to the passed outputstream.
    • PdfReader- Reads a PDF document.
    • PdfFontFactory- This class provides helpful methods for creating fonts ready to be used in a PdfDocument.
    • Table- A Table is a layout element that represents data in a two-dimensional grid.

Maven dependency

For using iText 7 library core modules you need to add iText 7 Core as a dependency to your pom.xml file. Maven will automatically download all the required modules from the repository.

<properties>
  <project.build.sourceEncoding>UTF-8</project.build.sourceEncoding>
  <itext.version>7.1.6</itext.version>
</properties>
<dependencies>
  <!-- add all iText 7 Community modules -->
  <dependency>
    <groupId>com.itextpdf</groupId>
    <artifactId>itext7-core</artifactId>
    <version>${itext.version}</version>
    <type>pom</type>
  </dependency>
</dependencies>

Examples of PDF generation using iText and Java given in this post.

HelloWorld PDF Creation Java and iText example

We’ll start with creating a simple HelloWorld PDF along with font and text color settings.

import com.itextpdf.io.font.constants.StandardFonts;
import com.itextpdf.kernel.colors.ColorConstants;
import com.itextpdf.kernel.font.PdfFont;
import com.itextpdf.kernel.font.PdfFontFactory;
import com.itextpdf.kernel.pdf.PdfDocument;
import com.itextpdf.kernel.pdf.PdfWriter;
import com.itextpdf.layout.Document;
import com.itextpdf.layout.element.Paragraph;
import com.itextpdf.layout.element.Text;

public class HelloWorldPDF {
  public static final String CREATED_PDF = "F://knpcode//result//HelloWorld.pdf";
  public static void main(String[] args) {
    PdfWriter writer;
    try {
      writer = new PdfWriter(new FileOutputStream(CREATED_PDF));
      PdfFont font = PdfFontFactory.createFont(StandardFonts.TIMES_ROMAN);
      PdfDocument pdf = new PdfDocument(writer);
      Document document = new Document(pdf);
      Text text = new Text("Hello World PDF created using iText")
                  .setFont(font)
                  .setFontSize(15)
                  .setFontColor(ColorConstants.MAGENTA);
      //Add paragraph to the document
      document.add(new Paragraph(text));
      document.close();
    } catch (IOException e) {
      // TODO Auto-generated catch block
      e.printStackTrace();
    }  
  }
}
Hello world pdf iText

PDF with Style for content styling

import java.io.IOException;
import com.itextpdf.io.font.constants.StandardFonts;
import com.itextpdf.kernel.colors.ColorConstants;
import com.itextpdf.kernel.font.PdfFont;
import com.itextpdf.kernel.font.PdfFontFactory;
import com.itextpdf.kernel.pdf.PdfDocument;
import com.itextpdf.kernel.pdf.PdfWriter;
import com.itextpdf.layout.Document;
import com.itextpdf.layout.Style;
import com.itextpdf.layout.element.Paragraph;
import com.itextpdf.layout.element.Text;

public class HelloWorldPDF {
  public static final String CREATED_PDF = "F://knpcode//result//Styled.pdf";
  public static void main(String[] args) {
    try {
      PdfDocument pdf = new PdfDocument(new PdfWriter(CREATED_PDF));				
      PdfFont font = PdfFontFactory.createFont(StandardFonts.COURIER);
      Style style = new Style().setFont(font)
                               .setFontSize(14)
                               .setFontColor(ColorConstants.RED)
                               .setBackgroundColor(ColorConstants.YELLOW);
				 
      Document document = new Document(pdf);
      document.add(new Paragraph()
              .add("In this PDF, ")
              .add(new Text("Text is styled").addStyle(style))
              .add(" using iText ")
              .add(new Text("Style").addStyle(style))
              .add("."));
      document.close();
    } catch (IOException e) {
      // TODO Auto-generated catch block
      e.printStackTrace();
    }  
  }
}
iText styling PDF content

Converting text file to PDF using iText

In the Java example there is a text file (Test.txt) which is converted to a PDF using iText.

import java.io.BufferedReader;
import java.io.FileReader;
import java.io.IOException;
import com.itextpdf.io.font.constants.StandardFonts;
import com.itextpdf.kernel.font.PdfFont;
import com.itextpdf.kernel.font.PdfFontFactory;
import com.itextpdf.kernel.pdf.PdfDocument;
import com.itextpdf.kernel.pdf.PdfWriter;
import com.itextpdf.layout.Document;
import com.itextpdf.layout.element.Paragraph;

public class TextToPDF {
  public static final String SOURCE_FILE = "F://knpcode//result//Test.txt";
  public static final String CREATED_PDF = "F://knpcode//result//Result.pdf";
  public static void main(String[] args) {
    try {
      BufferedReader br = new BufferedReader(new FileReader(SOURCE_FILE));
      PdfDocument pdf = new PdfDocument(new PdfWriter(CREATED_PDF));	
      Document document = new Document(pdf);
      String line;
      PdfFont font = PdfFontFactory.createFont(StandardFonts.COURIER);
      while ((line = br.readLine()) != null) {
        document.add(new Paragraph(line).setFont(font));
      }
      br.close();
      document.close();   
    } catch (IOException e) {
      // TODO Auto-generated catch block
      e.printStackTrace();
    } 
  }
}

Generating PDF with table

For this example we’ll use a bean class Employee and the list of employees is presented in a table in the PDF using Java program.

public class Employee {
  private String name;
  private String dept;
  private int salary;

  Employee(String name, String dept, int salary){
    this.name = name;
    this.dept = dept;
    this.salary = salary;
  }
  public String getName() {
    return name;
  }
  public void setName(String name) {
    this.name = name;
  }
  public int getSalary() {
    return salary;
  }
  public void setSalary(int salary) {
    this.salary = salary;
  }
  public String getDept() {
    return dept;
  }
  public void setDept(String dept) {
    this.dept = dept;
  }
}
import java.io.IOException;
import java.util.ArrayList;
import java.util.List;
import com.itextpdf.io.font.constants.StandardFonts;
import com.itextpdf.kernel.colors.ColorConstants;
import com.itextpdf.kernel.font.PdfFont;
import com.itextpdf.kernel.font.PdfFontFactory;
import com.itextpdf.kernel.pdf.PdfDocument;
import com.itextpdf.kernel.pdf.PdfWriter;
import com.itextpdf.layout.Document;
import com.itextpdf.layout.element.Cell;
import com.itextpdf.layout.element.Paragraph;
import com.itextpdf.layout.element.Table;
import com.itextpdf.layout.property.TextAlignment;
import com.itextpdf.layout.property.UnitValue;

public class PDFWithTable {
  public static final String CREATED_PDF = "F://knpcode//result//Employee.pdf";
  public static void main(String[] args) {
    List<Employee> employees = new ArrayList<Employee>();
    employees.add(new Employee("Jack", "HR", 12000));
    employees.add(new Employee("Liza", "IT", 5000));
    employees.add(new Employee("Jeremy", "Finance", 9000));
    employees.add(new Employee("Frederick", "Accounts", 8000));
    try {
      PdfDocument pdf = new PdfDocument(new PdfWriter(CREATED_PDF));
      Document document = new Document(pdf);
      PdfFont headerFont = PdfFontFactory.createFont(StandardFonts.TIMES_BOLD);
      PdfFont cellFont = PdfFontFactory.createFont(StandardFonts.TIMES_ROMAN);
      Table table = new Table(3);
      table.setWidth(UnitValue.createPercentValue(100));
      // adding header
      table.addHeaderCell(new Cell(1, 3)
           .setTextAlignment(TextAlignment.CENTER)
           .setBackgroundColor(ColorConstants.LIGHT_GRAY)
           .add(new Paragraph("Employee Information")
           .setFont(headerFont)));
      table.addHeaderCell(new Cell()
           .add(new Paragraph("Name")
           .setFont(headerFont)));
      table.addHeaderCell(new Cell()
           .add(new Paragraph("Dept")
           .setFont(headerFont)));
      table.addHeaderCell(new Cell()
           .add(new Paragraph("Salary")
           .setFont(headerFont)));
      // adding rows
      for(Employee emp : employees) {
        table.addCell(new Cell()
             .add(new Paragraph(emp.getName())
             .setFont(cellFont)));
        table.addCell(new Cell()
             .add(new Paragraph(emp.getDept())
             .setFont(cellFont)));
        table.addCell(new Cell()
             .add(new Paragraph(Integer.toString(emp.getSalary()))
             .setFont(cellFont)));
      }
      document.add(table);
      document.close();
    } catch (IOException e) {
        // TODO Auto-generated catch block
        e.printStackTrace();
    }  
  }
}
PDF Table iText

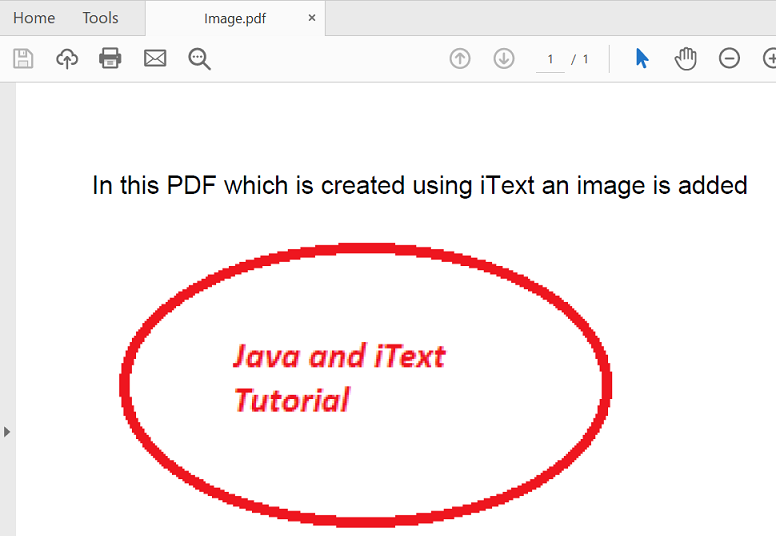
Adding image to PDF using iText

import java.io.FileOutputStream;
import java.io.IOException;
import com.itextpdf.layout.element.Image;
import com.itextpdf.io.image.ImageDataFactory;
import com.itextpdf.kernel.pdf.PdfDocument;
import com.itextpdf.kernel.pdf.PdfWriter;
import com.itextpdf.layout.Document;
import com.itextpdf.layout.element.Paragraph;

public class ImagePDF {
  public static final String IMAGE_PDF = "F://knpcode//result//Image.pdf";
  public static void main(String[] args) {
  PdfWriter writer;
  try {
    // path to image
    Image image = new Image(ImageDataFactory.create("images//iText image.png"));
    writer = new PdfWriter(new FileOutputStream(IMAGE_PDF));
    PdfDocument pdfDoc = new PdfDocument(writer);
    Document document = new Document(pdfDoc);       
    document.add(new Paragraph("In this PDF which is created using iText an image is added"));
    // adding image
    document.add(image);		      
    document.close();
    } catch (IOException e) {
     // TODO Auto-generated catch block
     e.printStackTrace();
    } 
  }
}
Image in PDF iText

Adding list to PDF using iText

If you want to add list items to a PDF you can do that using List and ListItem (for adding individual list items) classes.

There is an Enum ListNumberingType which has the symbols that can be used for numbering the list items.

import java.io.IOException;
import com.itextpdf.kernel.pdf.PdfDocument;
import com.itextpdf.kernel.pdf.PdfWriter;
import com.itextpdf.layout.Document;
import com.itextpdf.layout.element.List;
import com.itextpdf.layout.element.ListItem;
import com.itextpdf.layout.element.Paragraph;
import com.itextpdf.layout.property.ListNumberingType;

public class PDFWithTable {
  public static final String CREATED_PDF = "F://knpcode//result//List.pdf";
  public static void main(String[] args) {
    try {
      PdfDocument pdf = new PdfDocument(new PdfWriter(CREATED_PDF));
      // List items using Roman symbols
      Document document = new Document(pdf);
      List list = new List()
                 .setSymbolIndent(8) // space from the left
                 .setListSymbol(ListNumberingType.ROMAN_LOWER);
      document.add(new Paragraph("List with Roman symbols"));			
      // Add ListItem objects
      list.add(new ListItem("Item1"))
          .add(new ListItem("Item2"))
          .add(new ListItem("Item3"));
      // Add the list
      document.add(list);
      // List items using English Alphabets
      list = new List()
                 .setSymbolIndent(8) // space from the left
                 .setListSymbol(ListNumberingType.ENGLISH_UPPER);
      document.add(new Paragraph("List with English letter symbols"));			
      // Add ListItem objects
      list.add(new ListItem("Item1"))
          .add(new ListItem("Item2"))
          .add(new ListItem("Item3"));
      // Add the list
      document.add(list);
      // List items using English Alphabets
      list = new List()
                 .setSymbolIndent(8) // space from the left
                 .setListSymbol(ListNumberingType.GREEK_LOWER);
      document.add(new Paragraph("List with Greek letter symbols"));			
      // Add ListItem objects
      list.add(new ListItem("Item1"))
            .add(new ListItem("Item2"))
            .add(new ListItem("Item3"));
      // Add the list
      document.add(list);
      document.close();
    } catch (IOException e) {
      // TODO Auto-generated catch block
      e.printStackTrace();
    }  
  }
}
List Items iText

Render PDF in web application using iText

For rendering PDF to the browser using iText requires using ServletOutputStream as a parameter with PDFWriter. You can get this OutputStream from HTTPResponse.

PdfWriter writer;
try{
  // Setting HTTPResponse content type as PDF
  response.setContentType("application/pdf");
  writer = new PdfWriter(response.getOutputStream());
  PdfDocument pdfDoc = new PdfDocument(writer);
  Document document = new Document(pdfDoc); 
  PdfFont titleFont = PdfFontFactory.createFont(StandardFonts.TIMES_BOLD);
  PdfFont textFont = PdfFontFactory.createFont(StandardFonts.COURIER);
  document.add(new Paragraph("PDF generated in Web")
              .setFont(titleFont).setFontColor(ColorConstants.RED)
              .setTextAlignment(TextAlignment.CENTER));
  Paragraph p = new Paragraph("This PDF is rendered as a web response.");
  document.add(p.setFont(textFont).setFontColor(ColorConstants.ORANGE));
  document.close();
  }catch(Exception e){
      e.printStackTrace();
  }

That's all for the topic Generating PDF in Java Using iText Tutorial. If something is missing or you have something to share about the topic please write a comment.


You may also like

March 28, 2022

Java Spliterator With Examples

Spliterator in Java, just like Iterator and ListIterator, is used for traversing the elements of a source. How it differs from other iterator implementation is that the Spliterator API is designed to support efficient parallel traversal in addition to sequential traversal. Using Spliterator elements can be partitioned and iterated in parallel.

Important points about Java Spliterator

  1. Spliterator API is defined using Spliterator interface which is part of java.util package.
  2. Spliterator interface was added in Java 8.
  3. Source for a Spliterator could be an array, a Collection, an IO channel, or a generator function.
  4. Spliterator can be used for both parallel and sequential traversal.
  5. When you use Iterator for traversal you have to use two methods-

    a. hasNext() to ensure that there is next element

    b. next() method to use that element.

    Methods in Java Spliterator combine these two methods into one making it more convenient to use.

Java Spliterator methods

Spliterator API defines the following methods.
  1. characteristics()- Returns a set of characteristics of this Spliterator and its elements.
  2. estimateSize()- Returns an estimate of the number of elements or returns Long.MAX_VALUE if infinite, unknown, or too expensive to compute.
  3. forEachRemaining(Consumer<? super T> action)- Performs the given action for each remaining element, sequentially in the current thread, until all elements have been processed or the action throws an exception.
  4. getComparator()- If this Spliterator's source is SORTED by a Comparator, returns that Comparator.
  5. getExactSizeIfKnown()- Convenience method that returns estimateSize() if this Spliterator is SIZED, else -1.
  6. hasCharacteristics(int characteristics)- Returns true if this Spliterator's characteristics() contain all of the given characteristics.
  7. tryAdvance(Consumer<? super T> action)- If a remaining element exists, performs the given action on it, returning true; else returns false.
  8. trySplit()- Using this method spliterator can be partitioned into two. Returns a new Spliterator covering elements, that will, upon return from this method, not be covered by the current Spliterator.

Java Spliterator Characteristics

Spliterator also defines following characteristics which are constant int values.

  1. CONCURRENT- Characteristic value signifying that the element source may be safely concurrently modified by multiple threads without external synchronization.
  2. DISTINCT- Characteristic value signifying that for each pair of encountered elements x, y, !x.equals(y).
  3. IMMUTABLE- Characteristic value signifying that the element source cannot be structurally modified.
  4. NONNULL- Characteristic value signifying that the source guarantees that encountered elements will not be null.
  5. ORDERED- Characteristic value signifying that an encounter order is defined for elements.
  6. SIZED- Characteristic value signifying that the value returned from estimateSize() is the exact count of elements.
  7. SORTED- Characteristic value signifying that encounter order follows a defined sort order.
  8. SUBSIZED- Characteristic value signifying that all Spliterators resulting from trySplit() will be both SIZED and SUBSIZED.

Java Spliterator example

Let’s see some examples to understand how traversal is done using Spliterator and how to use its methods.

Traversing using Spliterator's tryAdvance() method
public class SpliteratorTraversal {
  public static void main(String[] args) {
    List<String> listOfNames = Arrays.asList("Clint", "Gregory", "James", "John", "Humphrey", "Cary", "Kirk");		
    Spliterator<String> spliterator = listOfNames.spliterator();
    System.out.println("--- Names in the list ---");
    while(spliterator.tryAdvance(System.out::println));
    spliterator = listOfNames.spliterator();
    System.out.println("--- Names in the list in upper case ---");
    while(spliterator.tryAdvance(n -> System.out.println(n.toUpperCase())));
  }
}
Output
--- Names in the list ---
Clint
Gregory
James
John
Humphrey
Cary
Kirk
--- Names in the list in upper case ---
CLINT
GREGORY
JAMES
JOHN
HUMPHREY
CARY
KIRK
Example using estimateSize(), getExactSizeIfKnown(), forEachRemaining() methods
public class SpliteratorTraversal {
  public static void main(String[] args) {
    List<String> listOfNames = Arrays.asList("Clint", "Gregory", "James", "John", "Humphrey", 
				                   "Cary", "Kirk");		
    Spliterator<String> spliterator = listOfNames.spliterator();
    System.out.println("Estimated Size of source- " + spliterator.estimateSize());	     
    System.out.println("Exact Size of source- " + spliterator.getExactSizeIfKnown());	     
    System.out.println("--- Names in the list in upper case ---");
    spliterator.forEachRemaining(n -> System.out.println(n.toUpperCase()));
  }
}
Output
Estimated Size of source- 7
Exact Size of source- 7
--- Names in the list in upper case ---
CLINT
GREGORY
JAMES
JOHN
HUMPHREY
CARY
KIRK
Splitting using trySplit() Java example
public class SpliteratorTraversal {
  public static void main(String[] args) {
    List<String> listOfNames = Arrays.asList("Clint", "Gregory", "James", "John", "Humphrey", 
				                   "Cary", "Kirk");		
    Spliterator<String> split1 = listOfNames.spliterator();
    Spliterator<String> split2 = split1.trySplit();
    // checking if spliterator is actually split
    if(split2 != null) {
     System.out.println("Partition- ");
     while(split2.tryAdvance((n) -> System.out.println(n)));
    }
    System.out.println("Partition- ");
    while(split1.tryAdvance((n) -> System.out.println(n)));
  }
}
Output
Partition- 
Clint
Gregory
James
Partition- 
John
Humphrey
Cary
Kirk

That's all for the topic Java Spliterator With Examples. If something is missing or you have something to share about the topic please write a comment.


You may also like

March 27, 2022

Convert ArrayList to Array in Java

In this post we’ll see how to convert ArrayList to array in Java.

Since internal implementation of ArrayList uses an array internally to store its element so ArrayList class itself provides toArray() method to convert ArrayList to array. There are two overloaded toArray() methods.

  • toArray()- Returns an array containing all of the elements in this list in proper sequence. The returned array will be "safe" in that no references to it are maintained by this list. Returned array is of type Object.
  • toArray(T[] a)- Returns an array containing all of the elements in this list in proper sequence. The runtime type of the returned array is that of the specified array.

Though one problem with using these methods to convert ArrayList to array in Java is that the reference of the stored objects are shared between both ArrayList and converted array. Any modification to any stored object will be reflected in other data structure too.

Another option is to do the conversion manually without using any method. See example.

First we'll see examples of using toArray() methods to  convert ArrayList to array. We'll also modify the stored object to show that the modification is reflected in the other data structure too. For that we’ll have to store custom objects in ArrayList so here is a class whose objects are stored in ArrayList.

public class Employee{
  private int empId;
  private String empName;
  private int age;
  Employee(int empId, String empName, int age){
    this.empId = empId;
    this.empName = empName;
    this.age = age;
  }
  public int getEmpId() {
    return empId;
  }
  public void setEmpId(int empId) {
    this.empId = empId;
  }
  public String getEmpName() {
    return empName;
  }
  public void setEmpName(String empName) {
    this.empName = empName;
  }
  public int getAge() {
    return age;
  }
  public void setAge(int age) {
    this.age = age;
  }
    
  @Override
  public String toString() {    
    return getEmpId() + " " + getEmpName() + " " + getAge();
  }
}

Using toArray(T[] a) method to convert ArrayList to array

Here we have an ArrayList storing objects of type Employee. Then this ArrayList is converted to array. Then an object in ArrayList is modified, same way an object is modified in array. As you can see both the changes are reflected in both ArrayList as well as array.

import java.util.ArrayList;
import java.util.Arrays;
import java.util.List;

public class ListToArray {
  public static void main(String[] args) {
    List<Employee> empList = new ArrayList<Employee>();
    empList.add(new Employee(1, "Zhiang", 34));
    empList.add(new Employee(2, "Marie", 23));
    empList.add(new Employee(3, "Amy", 31));
    empList.add(new Employee(4, "Robbie", 45));
    // creating array of same size as list
    Employee[] empArr = new Employee[empList.size()];
    // Converting ArrayList to array   
    empArr = empList.toArray(empArr);
        
    System.out.println("Employees- " + Arrays.toString(empArr));
    // Making change in list element       
    empList.get(3).setEmpName("Jack");
    // Making change in Array element
    empArr[1].setAge(45);
    System.out.println("After modifications");
    System.out.println("List elements-- " + empList);
    System.out.println("Employees- " + Arrays.toString(empArr));
  }
}
Output
Employees- [1 Zhiang 34, 2 Marie 23, 3 Amy 31, 4 Robbie 45]
After modifications
List elements-- [1 Zhiang 34, 2 Marie 45, 3 Amy 31, 4 Jack 45]
Employees- [1 Zhiang 34, 2 Marie 45, 3 Amy 31, 4 Jack 45]

Using toArray() method to convert ArrayList to array

import java.util.ArrayList;
import java.util.List;

public class ListToArray {
  public static void main(String[] args) {
    List<String> carList = new ArrayList<String>();
    carList.add("Audi");
    carList.add("Jaguar");
    carList.add("BMW");
    carList.add("Mini Cooper");
    Object[] carArr = carList.toArray();
    for(Object car : carArr) {
      System.out.println("Car- " + car);
    }
  }
}

As you can see the converted array is of type Object which is a drawback of using this method.

Converting ArrayList to array without any API methods

You can also convert ArrayList to array in Java by iterating the ArrayList and then assigning elements to array.

public class ListToArray {
  public static void main(String[] args) {
    List<String> carList = new ArrayList<String>();
    carList.add("Audi");
    carList.add("Jaguar");
    carList.add("BMW");
    carList.add("Mini Cooper");
    // creating array of same size as list
    String[] carArr = new String[carList.size()];

    // iterate list and assign values to array
    for(int i =0; i < carList.size(); i++){
      carArr[i] = carList.get(i);
    }      
    System.out.println("Cars- " + Arrays.toString(carArr));        
  }
}

That's all for the topic Convert ArrayList to Array in Java. If something is missing or you have something to share about the topic please write a comment.


You may also like
March 25, 2022

Java String charAt() Method

If you want to get specific character of the String by index you can use charAt() method of the String class in Java.

charAt() method

  • char charAt(int index)- Returns the char value at the specified index. For a String of length n the passed index should be with in the range 0 to n-1. Method throws IndexOutOfBoundsException if the index argument is negative or not less than the length of this string.

Java String charAt() method examples

1. Using charAt() to get the first and last characters of the String.

public class StringCase {
  public static void main(String[] args) {
    String str = "Hello World";
    // getting first character
    char firstChar = str.charAt(0);
    // getting last character
    char lastChar = str.charAt(str.length()-1);
    System.out.println("First character- " + firstChar);
    System.out.println("Last character- " + lastChar);
  }
}
Output
First character- H
Last character- d

Since index starts at 0 so first character is retrieved using the index 0. For getting the last character of the String, length() method of the String class is used to get the length of the String.

2. Getting all the characters of the String by iterating the String and retrieving each character using charAt() method.

public class StringCase {
  public static void main(String[] args) {
    String str = "Hello World";
    for(int i = 0; i < str.length(); i++) {
      System.out.println(str.charAt(i));
    }
  }
}
Output
H
e
l
l
o
 
W
o
r
l
d

3. If any index outside the range of the String is used that results in IndexOutOfBoundsException.

public class StringCase {
  public static void main(String[] args) {
    String str = "Hello World";
    System.out.println(str.charAt(20));
  }
}
Output
Exception in thread "main" java.lang.StringIndexOutOfBoundsException: String index out of range: 20
	at java.base/java.lang.StringLatin1.charAt(StringLatin1.java:44)
	at java.base/java.lang.String.charAt(String.java:692)
	at com.knpcode.proj.Programs.String.StringCase.main(StringCase.java:7)

That's all for the topic Java String charAt() Method. If something is missing or you have something to share about the topic please write a comment.
You may also like

March 24, 2022

Java String matches() Method

In this post we’ll see how to use Java String matches() method which tells whether the String matches the given regular expression or not. This method is useful if you have a bunch of Strings and you want to separate specific type of Strings by passing the specified pattern as a regular expression.

matches() method in String class

  • boolean matches(String regex)- Tells whether or not this string matches the given regular expression.

Method returns true if string matches the given regular expression otherwise false is returned. PatternSyntaxException is thrown if the regular expression's syntax is invalid.

matches() method Java examples

1. In the following example there are two strings and matches method is used to match strings with regular expression. Regex .* means any number of characters so .*knpcode.* means any number of characters before and after knpcode.

public class StringMatch {
  public static void main(String[] args) {
    String str1 = "In technical blog knpcode you will find many interesting Java articles";
    String str2 = "Java programming language is the most used language";
    System.out.println("knpcode found in str1- " + str1.matches(".*knpcode.*"));
    System.out.println("knpcode found in str2- " + str2.matches(".*knpcode.*"));

    System.out.println("Java found in str1- " + str1.matches(".*Java.*"));
    System.out.println("Java found in str2- " + str2.matches(".*Java.*"));
  }
}
Output
knpcode found in str1- true
knpcode found in str2- false
Java found in str1- true
Java found in str2- true

2. In a list of Strings you want to match those strings which have only alphabets. Regular expression [a-zA-Z]+ used in the example matches alphabets a-z both lower case and upper case.

public class StringMatch {
  public static void main(String[] args) {
    List<String> strList = Arrays.asList("abc", "1a2b", "839", "Toy");
    for(String str : strList) {
      // regex to match alphabets
      if(str.matches("[a-zA-Z]+"))
        System.out.println(str);			
    }
  }
}
Output
abc
Toy

That's all for the topic Java String matches() Method. If something is missing or you have something to share about the topic please write a comment.


You may also like

March 23, 2022

Java String replace Method With Examples

In Java String class there are four replace() methods to replace occurrences of character or string with another character or string.

  • String replace(char oldChar, char newChar)- Returns a string resulting from replacing all occurrences of oldChar in this string with newChar. See example.
  • String replace(CharSequence target, CharSequence replacement)- Replaces each substring of this string that matches the target sequence with the specified literal replacement sequence. Note that the replacement starts from the beginning of the string to the end, or example, replacing "aa" with "b" in the string "aaa" will result in "ba" rather than "ab". See example.
  • String replaceAll(String regex, String replacement)- Replaces each substring of this string that matches the given regular expression with the given replacement. See example.
  • String replaceFirst(String regex, String replacement)- Replaces the first substring of this string that matches the given regular expression with the given replacement. See example.
Let’s see examples of these Java String replace() methods to make their usage clearer.

Java String replace() method for replacing chars

In the example there is a String where values are delimited using comma which is replaced by colon (:) using replace() method.

public class StringReplace {
  public static void main(String[] args) {
    String str = "A001,BOA,Nicki,12000";
    str = str.replace(',', ':');
    System.out.println(str);
  }
}
Output
A001:BOA:Nicki:12000

Java String replace() method for replacing substrings

In this variant of replace method CharSequence is passed as parameter rather than char. CharSequence is an interface which is implemented by String, StringBuffer and StringBuilder so objects of these classes can be passed.

public class StringReplace {
  public static void main(String[] args) {
    String str = "String misspelt as strong so replace strong with string";
    str = str.replace("strong", "string");
    System.out.println(str);
  }
}
Output
String misspelt as string so replace string with string

Java String replaceAll() method

With replaceAll() method you can pass a regular expression and all the substrings matching the regular expression are replaced with replacement string.

In the following example regex matches any number of spaces which are replaced with no space.

public class StringReplace {
  public static void main(String[] args) {
    String str = "  Test   String    ";
    // Matches any number of spaces
    str = str.replaceAll("\\s+", "");
    System.out.println(str);
  }
}
Output
TestString

Java String replaceFirst() method

With replaceFirst() method you can pass a regular expression and only the first substring matching the regular expression is replaced with replacement string.

public class StringReplace {
  public static void main(String[] args) {
    String str = "Hello world, Hello again";
    str = str.replaceFirst("Hello", "Hey");
    System.out.println(str);
  }
}
Output
Hey world, Hello again

That's all for the topic Java String replace Method With Examples. If something is missing or you have something to share about the topic please write a comment.


You may also like

March 21, 2022

Create Java Project Using Maven in Eclipse

In this post we’ll see how to create Java project using Maven in Eclipse IDE. For that Maven Eclipse plugin is used which comes pre-installed in Eclipse now.

Steps for creating Java Maven project in Eclipse

  1. Go to File – New – Maven Project
  2. In the "New Maven Project" window check "Create a simple project (skip archetype selection)" and click Next.
    Maven Project in Eclipse
  3. In the next window enter group id and artifact id.
    • GroupId – This is an Id of project’s group. This ID uniquely identifies the group that may have many sub-projects. For example com.knpcode.spring may contain other projects related to Spring.
    • ArtifactId– This is an Id of the project. This ID uniquely identifies a project, for example SpringXML. GroupId + ArtifactId defines the artifact’s location with in the repository for example com.knpcode.spring.SpringXML

    Maven Artifact
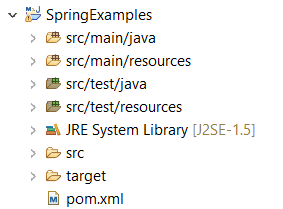
  4. Click finish, project structure will be created as shown below.
    Maven Project Structure

One thing that you may need to change is JRE system library which is Java 5 by default. By going to Java build path you can change the library.

That’s all for the topic Create Java Project Using Maven in Eclipse. If something is missing or you have something to share about the topic please write a comment.


You may also like
March 20, 2022

Java Program to Find File Extension

While doing file I/O operations in Java you may need to know the extension of the file. In this post we’ll see a Java program to get the file extension. Since there is no direct Java File API method to get the file extension you will have to use the Java String class methods to do that.

Another option is to use Apache IO where FilenameUtils has a method getExtension() to get the file name. But that requires Apache IO jar in the class path.

Getting file extension Java program

1. In String class there is a lastIndexOf(int ch) method that gives the index of the last occurrence of the specified character, using that you can get the index of the last '.' and using subString() you can get the string after that last dot. That way you can get the extension of the passed file.

public class FileExtension {
  public static void main(String[] args) throws IOException {
    File file = new File("F:\\knpcode\\links.txt");
    String extension = getFileExtension(file);
    System.out.println("Extension is- " + extension);
    
    file = new File("F:\\knpcode\\Ubuntu Page.html");
    extension = getFileExtension(file);
    System.out.println("Extension is- " + extension);
  }
	
  private static String getFileExtension(File file) {
    // null and file exist check
    if(file == null || !file.exists()){
      return "File not found";
    }
    
    String fileName = file.getName();
    int extIndex = fileName.lastIndexOf(".");
    // -1 is returned if index is not found
    if(extIndex == -1) {
      return "";
    }else {
      return fileName.substring(fileName.lastIndexOf("."));
    }
  }
}
Output
Extension is- .txt
Extension is- .html

If you don’t want the accompanying '.' then use

fileName.substring(fileName.lastIndexOf(".") + 1

2. Using Apache IO library which provides FilenameUtils class with method getExtension() which returns the textual part of the filename after the last dot. If there is no extension then empty string is returned, if file is null then null is returned.

import java.io.File;
import java.io.IOException;
import org.apache.commons.io.FilenameUtils;

public class FileExtension {
  public static void main(String[] args) throws IOException {
    File file = new File("F:\\knpcode\\links.txt");
    String extension = getFileExtensionApache(file);
    System.out.println("Extension is- " + extension);
    
    file = new File("F:\\knpcode\\Ubuntu Page.html");
    extension = getFileExtensionApache(file);
    System.out.println("Extension is- " + extension);
  }
		
  private static String getFileExtensionApache(File file) {
    return FilenameUtils.getExtension(file.getName());
  }
}
Output
Extension is- txt
Extension is- html

That's all for the topic Java Program to Find File Extension. If something is missing or you have something to share about the topic please write a comment.


You may also like

March 19, 2022

How to Create Temporary File in Java

Sometimes in your Java application you may want to store some data in a temporary file that can safely be deleted when the work is done. Java IO and NIO APIs itself provide methods to create a temporary file in Java.

Methods in java.io.File class to create temporary file

In java.io.File class there are two methods:

  • createTempFile(String prefix, String suffix)- Creates an empty file in the default temporary-file directory, using the given prefix and suffix to generate its name.
  • createTempFile(String prefix, String suffix, File directory)- Creates a temp file in the specified directory, using the given prefix and suffix strings to generate its name. Specified directory should be an existing directory

Temporary file creation Java example using java.io.File class methods

import java.io.File;
import java.io.IOException;

public class TempFileCreation {
  public static void main(String[] args) {
    try {
      // Using default temp directory
      File tempFile = File.createTempFile("TempFile", ".temp");
      System.out.println("Temporary file path (Default)- " + tempFile.getCanonicalPath());
      // Specifying directory
      File testFile = File.createTempFile("TempFile", ".temp", new File("F:\\knpcode"));
      System.out.println("Temporary file path- " + testFile.getCanonicalPath());
      // Work with temp file (IO Operations)
      // Delete on exit
      tempFile.deleteOnExit();
      testFile.deleteOnExit();
    } catch (IOException e) {
      // TODO Auto-generated catch block
      e.printStackTrace();
    } 
  }
}
Output
Temporary file path (Default)- C:\Users\knpcode\AppData\Local\Temp\TempFile8121084790462887465.temp
Temporary file path- F:\knpcode\TempFile7094477988758089030.temp

Note that deleteOnExit() method is used to delete the file when the virtual machine terminates.

Methods in java.nio.file.Files class to create temporary file

In java.nio.file.Files class there are two methods:

  • createTempFile(String prefix, String suffix, FileAttribute<?>... attrs)- Creates temp file in the default temporary-file directory, using the given prefix and suffix to generate its name.
  • createTempFile(Path dir, String prefix, String suffix, FileAttribute<?>... attrs)- Creates temp file in the specified directory, using the given prefix and suffix strings to generate its name.

Temporary file creation Java example using java.nio.file.Files class methods

import java.io.IOException;
import java.nio.file.Files;
import java.nio.file.Path;

public class TempFileCreation {
  public static void main(String[] args) {
    try {
      // Using default directory
      Path tempFile = Files.createTempFile("TempFile", ".temp");
      System.out.println("Temporary file path (Default)- " + tempFile);
      // Specifying directory
      Path testFile = Files.createTempFile(Path.of("F:\\knpcode"), "TempFile", ".temp");
      System.out.println("Temporary file path- " + testFile);
      // Work with temp file (IO Operations)
      // Delete on exit  
      tempFile.toFile().deleteOnExit();
      testFile.toFile().deleteOnExit();
    } catch (IOException e) {
      // TODO Auto-generated catch block
      e.printStackTrace();
    } 
  }
}
Output
Temporary file path (Default)- C:\Users\knpcode\AppData\Local\Temp\TempFile14952623994848508190.temp
Temporary file path- F:\knpcode\TempFile10342615863071845696.temp

That's all for the topic How to Create Temporary File in Java. If something is missing or you have something to share about the topic please write a comment.


You may also like

March 18, 2022

Write a File Asynchronously in Java

This post shows how to Write a file asynchronously in Java using the java.nio.channels.AsynchronousFileChannel class. Using AsynchronousFileChannel you can create an asynchronous file channel for reading, writing, and manipulating a file.

Writing file using AsynchronousFileChannel

Just like reading a file asynchronously, for asynchronous writing also there are two write methods-

  1. One of the write() method returns a Future instance representing the result of an asynchronous computation.
  2. In another write() method CompletionHandler instance is passed as an argument which consumes the result of an asynchronous I/O operation.

1. Java program to write file asynchronously

First we’ll use write method that returns Future instance.

Future<Integer> write(ByteBuffer src, long position)- Writes a sequence of bytes to this channel from the given buffer (represented by src), starting at the given file position. The method returns a Future representing the pending result of the write operation. The Future's get method returns the number of bytes written.

import java.io.IOException;
import java.nio.ByteBuffer;
import java.nio.channels.AsynchronousFileChannel;
import java.nio.file.Path;
import java.nio.file.Paths;
import java.nio.file.StandardOpenOption;
import java.util.concurrent.ExecutionException;
import java.util.concurrent.Future;

public class AsyncWrite {
  public static void main(String[] args) {
    // Path to the file for write operation
    Path path = Paths.get("F:\\knpcode\\Write.txt");
    // Create buffer acting as data source
    ByteBuffer buffer = ByteBuffer.allocate(1024);
    // Data that has to be written
    buffer.put("This is test data".getBytes());
    // Reset current position to 0 and limit 
    // as current buffer position 
    buffer.flip();
    try(AsynchronousFileChannel asyncChannel = AsynchronousFileChannel.open(path, StandardOpenOption.WRITE)){
      // Write from buffer, start from position 0
      Future<Integer> future =  asyncChannel.write(buffer, 0);
      while(!future.isDone()) {
        System.out.println("Waiting for the asynchronous file write operation ..... ");
        System.out.println("Do some other processing");
      }   
      buffer.clear();
      
      System.out.println("Write operation done, bytes written- " + future.get());
    } catch (IOException | InterruptedException | ExecutionException e) {
      // TODO Auto-generated catch block
      e.printStackTrace();
    }
  }
}

2. Write file asynchronously using CompletionHandler

In this Java program to write file asynchronously we’ll use another write method that takes CompletionHandler as an argument.

public abstract <A> void write(ByteBuffer src, long position, A attachment, CompletionHandler<Integer,? super A> handler)- Writes a sequence of bytes to this channel from the given buffer, starting at the given file position.

java.nio.channels.CompletionHandler interface has two callback methods which you need to implement when using this write method.

  1. completed- This method is invoked when the I/O operation completes successfully.
  2. failed- This method is invoked if the I/O operations fails.
import java.io.IOException;
import java.nio.ByteBuffer;
import java.nio.channels.AsynchronousFileChannel;
import java.nio.channels.CompletionHandler;
import java.nio.file.Path;
import java.nio.file.Paths;
import java.nio.file.StandardOpenOption;

public class AsyncWrite {
  public static void main(String[] args) {
    // Path to the file for write operation
    Path path = Paths.get("F:\\knpcode\\Write.txt");
    // Create buffer acting as data source
    ByteBuffer buffer = ByteBuffer.allocate(1024);
    // Data that has to be written
    buffer.put("This is test data".getBytes());
    // Reset current position to 0 and limit 
    // as current buffer position 
    buffer.flip();
    try(AsynchronousFileChannel asyncChannel = AsynchronousFileChannel.open(path, StandardOpenOption.WRITE)){
      // Write from buffer, start from position 0
      asyncChannel.write(buffer, 0, buffer, new CompletionHandler<Integer, ByteBuffer>() {

        @Override
        public void completed(Integer result, ByteBuffer attachment) {
          System.out.println("Write operation done, bytes written- " + result);
          attachment.clear();
        }

        @Override
        public void failed(Throwable exc, ByteBuffer attachment) {
          System.out.println("Write operation failed- " + exc.getMessage());					
        }
      });			
    } catch (IOException e) {
      // TODO Auto-generated catch block
      e.printStackTrace();
    }
  }
}

Once the I/O operation finishes, completed() method is called. First argument of the completed() method is of type Integer specifying the number of bytes written. Type of the second argument “attachment” corresponds to the type of the third argument to the write() method, ByteBuffer in this case. Attachment specifies the buffer containing the content.

That's all for the topic Write a File Asynchronously in Java. If something is missing or you have something to share about the topic please write a comment.


You may also like

March 17, 2022

Read File Asynchronously in Java

This post shows how to read file in Java asynchronously using the java.nio.channels.AsynchronousFileChannel class. Using AsynchronousFileChannel you can create an asynchronous file channel for reading, writing, and manipulating a file.

To see how to write a file asynchronously in Java, check this post- Write a File Asynchronously in Java

Reading file using AsynchronousFileChannel

For reading a file there are two read methods-

  1. One of the read() method returns a Future instance representing the result of an asynchronous computation.
  2. In another read() method CompletionHandler instance is passed as an argument which consumes the result of an asynchronous I/O operation.

1. Java program to read file asynchronously

First let’s see a program which uses the read method that returns Future instance.

Future<Integer> read(ByteBuffer bufffer, long position)- Reads a sequence of bytes from this channel into the given buffer, starting at the given file position.

import java.io.IOException;
import java.nio.ByteBuffer;
import java.nio.channels.AsynchronousFileChannel;
import java.nio.file.Path;
import java.nio.file.Paths;
import java.nio.file.StandardOpenOption;
import java.util.concurrent.Future;

public class AsyncRead {
  public static void main(String[] args) {
    Path path = Paths.get("F:\\knpcode\\links.txt");
    // Create buffer into which data is read
    ByteBuffer buffer = ByteBuffer.allocate(1024);
    // Create channel
    try(AsynchronousFileChannel asyncChannel = AsynchronousFileChannel.open(path, StandardOpenOption.READ)){
      Future<Integer> result = asyncChannel.read(buffer, 0);
      // Immediately returns here
      while(!result.isDone()) {
        System.out.println("Waiting for the asynchronous file read operation ..... ");
        System.out.println("Do some other processing");
      }
      // Reset current position to 0 and limit 
      // as current buffer position 
      buffer.flip();
      String data = new String(buffer.array()).trim();
      System.out.println(data);
      buffer.clear();            
    } catch (IOException e) {
      // TODO Auto-generated catch block
      e.printStackTrace();
    }        
  }
}

2. Read file asynchronously using CompletionHandler

There is another read method in AsynchronousFileChannel class for reading asynchronously which takes CompletionHandler as an argument.

read(ByteBuffer dst, long position, A attachment, CompletionHandler<Integer,? super A> handler)- Reads a sequence of bytes from this channel into the given buffer, starting at the given file position.

java.nio.channels.CompletionHandler interface has two callback methods-

  1. completed- This method is invoked when the I/O operation completes successfully.
  2. failed- This method is invoked if the I/O operations fails.
import java.io.IOException;
import java.nio.ByteBuffer;
import java.nio.channels.AsynchronousFileChannel;
import java.nio.channels.CompletionHandler;
import java.nio.file.Path;
import java.nio.file.Paths;
import java.nio.file.StandardOpenOption;

public class AsyncRead {
  public static void main(String[] args) {
    Path path = Paths.get("F:\\knpcode\\links.txt");
    // Create buffer into which data is read (capacity in bytes)
    ByteBuffer buffer = ByteBuffer.allocate(1024);
    // Create channel
    try(AsynchronousFileChannel asyncChannel = AsynchronousFileChannel.open(path, StandardOpenOption.READ)){
      asyncChannel.read(buffer, 0, buffer, new CompletionHandler<Integer, ByteBuffer>() {
        @Override
        public void completed(Integer result, ByteBuffer attachment) {
          System.out.println("Number of bytes read- " + result);
          attachment.flip();
          String data = new String(attachment.array()).trim();
          System.out.println(data);
          attachment.clear();
        }

        @Override
        public void failed(Throwable exc, ByteBuffer attachment) {
          System.out.println("Read operation failed- " + exc.getMessage());
          
        }			
      });
      System.out.println("Waiting for the asynchronous file read operation");
    } catch (IOException e) {
      // TODO Auto-generated catch block
      e.printStackTrace();
    }		
  }
}

Once the I/O operation finishes, completed() method is called. First argument of the completed() method is of type Integer specifying the number of bytes read. Type of the second argument “attachment” corresponds to the type of the third argument to the read() method, ByteBuffer in this case. Attachment specifies the buffer containing the content.

That's all for the topic Read File Asynchronously in Java . If something is missing or you have something to share about the topic please write a comment.


You may also like

March 16, 2022

How to Append to a File in Java

In the post How to Write to a File in Java examples are already given to write to a file in Java but the examples shown there would create a new file or overwrite existing file when writing. Sometimes you may need to append to an existing file rather than overwriting it so this post shows options to append content to a file in Java.

In Java there are two classes FileWriter and FileOutputStream for writing to a file. Where FileWriter is meant for writing streams of characters and FileOutputStream is used for writing streams of raw bytes. Both of these classes have a constructor with a boolean argument. When that boolean argument is passed as true then the content will be written to the end of the file.

For example– public FileWriter(File file, boolean append);

You should always use the wrapper classes BufferedWriter and BufferedOutputStream rather than using these classes directly.

Apart from these classes Files class added in Java 7 also provides methods for appending to a file in Java. There is Files.write() method which can be used.

Files.write(path, bytes, StandardOpenOption.APPEND);

Another method is-

Files.newBufferedWriter(Path path, StandardOpenOption.APPEND);

Java program to append to a file in Java

Let’s see examples of appending to a file in Java using the above mentioned options.

Appending to a file using Java BufferedWriter

import java.io.BufferedWriter;
import java.io.FileWriter;
import java.io.IOException;

public class AppendFile {

  public static void main(String[] args) {
    //Change path for windows
    appendToFile("D://test.txt");
  }

  private static void appendToFile(String fileName){
    BufferedWriter bw = null;
    try {
      // wrapping FileWriter instance, passing second arg 
      // as true for appending
      bw = new BufferedWriter(new FileWriter(fileName, true));
      bw.write("This is a test line");
      bw.newLine();
      bw.write("Line written by Java program in knpCode.com");
      bw.newLine();		
    }catch (IOException e) {
       e.printStackTrace();
    }finally{
      if(bw != null){
        try {
          bw.close();
          } catch (IOException e) {
           // TODO Auto-generated catch block
           e.printStackTrace();
          }
      }
    }
  }
}

Appending to a file using Java BufferedOutputStream

If you have to write raw bytes then you can use BufferedOutputStream class. In the example code getBytes() method is used to encode string into bytes.

import java.io.BufferedOutputStream;
import java.io.FileOutputStream;
import java.io.IOException;

public class AppendFile {

  public static void main(String[] args) {
    //Change path for windows
    appendToFile("D://test.txt");
  }

  private static void appendToFile(String fileName){
    BufferedOutputStream bos = null;
    try {
      // wrapping FileOutputStream instance, passing second arg 
      // as true for appending
      bos = new BufferedOutputStream(new FileOutputStream(fileName, true));
      // \r\n for windows
      bos.write("This is a test line\r\n".getBytes());
      bos.write("Line written by Java program in knpCode.com\r\n".getBytes());
    }catch (IOException e) {
       e.printStackTrace();
    }finally{
      if(bos != null){
        try {
          bos.close();
          } catch (IOException e) {
           // TODO Auto-generated catch block
           e.printStackTrace();
          }
      }
    }
  }
}

Java program to append to a file using Files.write() method

import java.io.IOException;
import java.nio.file.Files;
import java.nio.file.Paths;
import java.nio.file.StandardOpenOption;

public class AppendFile {

  public static void main(String[] args) {
     String content = "This is a test line.\nLine written by Java program in knpCode.com.";
     try {
      Files.write(Paths.get("D:\\test.txt"), content.getBytes(), StandardOpenOption.APPEND);
    } catch (IOException e) {
      // TODO Auto-generated catch block
      e.printStackTrace();
    }
  }
}

Append to a file using Files.newBufferedWriter() method

import java.io.BufferedWriter;
import java.io.IOException;
import java.nio.file.Files;
import java.nio.file.Paths;
import java.nio.file.StandardOpenOption;

public class AppendFile {
  public static void main(String[] args) {
    String content = "This is a test line.\nLine written by Java program in knpCode.com.";		
    try (BufferedWriter bw = Files.newBufferedWriter(Paths.get("D:\\test.txt"), StandardOpenOption.APPEND)) {
       bw.write(content);			 
    } catch (IOException e) {
      // TODO Auto-generated catch block
      e.printStackTrace();
    }
  }
}

Here try-with-resources is used to close the resources automatically rather than closing them explicitly using finally block.

That's all for the topic How to Append to a File in Java. If something is missing or you have something to share about the topic please write a comment.


You may also like

March 15, 2022

Spring Bean Definition Inheritance

Just like the OOPS concept of inheritance is used in object oriented language where child class can inherit attributes and methods of a parent class same way in Spring framework child bean can inherit configuration data from a parent definition. In this post we’ll see how bean definition inheritance works in Spring.

Bean definition inheritance in Spring

A bean definition can contain a lot of configuration information, including constructor arguments, property values, and container-specific information, such as the initialization method, a static factory method name, and so on. A child bean definition can inherit that configuration information from a parent bean rather than defining everything again. The child definition can override some values or add others as needed.

How does bean definition inheritance work

Parent bean definition that is inherited in the child bean definition is specified using parent attribute of the <bean> element. For example in the following configuration parent bean definition is inherited by empBean using the parent attribute and it inherits the property company from parent bean definition and adds name property of its own.

<bean id="baseEmpBean" class="com.knpcode.Employee">
  <property name="company" value="XYZ"/>
</bean> 
    
<bean id="empBean" parent="baseEmpBean">
  <property name="name" value="Jack" />
</bean>
In the configuration you can see that the child bean definition doesn’t specify a bean class.

A child bean definition doesn't need to specify a bean class it can use the bean class from the parent definition. Though child bean definition can also override bean class, if it does then the child bean class must be compatible with the parent (that is, it must accept the parent’s property values). For example-

<bean id="parentBean" class="com.knpcode.TestBean">
  <property name="name" value="parent"/>
  <property name="mode" value="inherit"/>
</bean>

<bean id="childBean" class="org.springframework.beans.DerivedTestBean" parent="inheritedTestBean" >
  <property name="name" value="override"/>
  <!--  mode property value will be inherited from parent -->
</bean>

Spring Bean definition inheritance Example

In the example there is a bean class Employee with properties empId, empName, company, dept. In the parent definition value for company property is assigned which is inherited by the child bean definition.

public class Employee {
  int empId;
  String empName;
  String company;
  String dept;
  public int getEmpId() {
    return empId;
  }
  public void setEmpId(int empId) {
    this.empId = empId;
  }
  public String getEmpName() {
    return empName;
  }
  public void setEmpName(String empName) {
    this.empName = empName;
  }
  public String getDept() {
    return dept;
  }
  public void setDept(String dept) {
    this.dept = dept;
  }
  public String getCompany() {
    return company;
  }
  public void setCompany(String company) {
    this.company = company;
  }

  @Override
  public String toString() {
    return "Id= " + getEmpId() + " Name= " + 
             getEmpName() + " Dept= "+ getDept()
             + " Company= " + getCompany();
  }
}
Configuration
<?xml version="1.0" encoding="UTF-8"?>
<beans xmlns="http://www.springframework.org/schema/beans"
       xmlns:xsi="http://www.w3.org/2001/XMLSchema-instance"
       xmlns:context="http://www.springframework.org/schema/context"
       xsi:schemaLocation="http://www.springframework.org/schema/beans 
          http://www.springframework.org/schema/beans/spring-beans.xsd
          http://www.springframework.org/schema/context
          http://www.springframework.org/schema/context/spring-context.xsd">
    
  <bean id="baseEmpBean" class="com.knpcode.springproject.model.Employee">
    <property name="company" value="XYZ"/>
  </bean> 
  <bean id="empBean" parent="baseEmpBean">
    <property name="empId" value="1" />
    <property name="empName" value="Jack" />
    <property name="dept" value="HR" />
  </bean>
</beans>

You can use the following class with main method to read the configuration and access the beans.

public class App {
  public static void main( String[] args ){
    // create context using configuration
    ClassPathXmlApplicationContext context = new ClassPathXmlApplicationContext("appcontext.xml");
    Employee emp =  context.getBean("empBean", Employee.class);
    System.out.println(emp);
    context.close();
  }
}
Output
20:09:24.009 [main] DEBUG org.springframework.beans.factory.support.DefaultListableBeanFactory - Creating shared instance of singleton bean 'baseEmpBean'
20:09:24.140 [main] DEBUG org.springframework.beans.factory.support.DefaultListableBeanFactory - Creating shared instance of singleton bean 'empBean'
Id= 1 Name= Jack Dept= HR Company= XYZ

Abstract attribute in Spring Bean definition inheritance

If you want to restrict instantiation of parent bean then you can mark it as abstract="true" to do that.

Abstract attribute in Spring bean definition
<?xml version="1.0" encoding="UTF-8"?>
<beans xmlns="http://www.springframework.org/schema/beans"
      xmlns:xsi="http://www.w3.org/2001/XMLSchema-instance"
      xmlns:context="http://www.springframework.org/schema/context"
      xsi:schemaLocation="http://www.springframework.org/schema/beans 
        http://www.springframework.org/schema/beans/spring-beans.xsd
        http://www.springframework.org/schema/context
        http://www.springframework.org/schema/context/spring-context.xsd">
  <!-- acts as a template -->
  <bean id="baseEmpBean" abstract="true" class="com.knpcode.springproject.model.Employee">
    <property name="company" value="XYZ"/>
  </bean> 
  <bean id="empBean" parent="baseEmpBean" >
    <property name="empId" value="1" />
    <property name="empName" value="Jack" />
    <property name="dept" value="HR" />
  </bean>
</beans>

With parent marked as abstract trying to access parent bean results in an error.

Exception in thread "main" org.springframework.beans.factory.BeanIsAbstractException: Error creating bean with name 'baseEmpBean': Bean definition is abstract
	at org.springframework.beans.factory.support.AbstractBeanFactory.checkMergedBeanDefinition(AbstractBeanFactory.java:1335)
	at org.springframework.beans.factory.support.AbstractBeanFactory.doGetBean(AbstractBeanFactory.java:295)
	at org.springframework.beans.factory.support.AbstractBeanFactory.getBean(AbstractBeanFactory.java:204)
	at org.springframework.context.support.AbstractApplicationContext.getBean(AbstractApplicationContext.java:1111)
	at com.knpcode.springproject.App.main(App.java:14)

Parent bean as Template in Spring bean inheritance

By marking parent bean definition as abstract=”true” and not specifying a class too you can use parent only as a pure template bean definition that serves as a parent definition for child definitions.

Note that if the parent definition does not specify a class, explicitly marking the parent bean definition as abstract is required.

Template bean definition example
<?xml version="1.0" encoding="UTF-8"?>
<beans xmlns="http://www.springframework.org/schema/beans"
       xmlns:xsi="http://www.w3.org/2001/XMLSchema-instance"
       xmlns:context="http://www.springframework.org/schema/context"
       xsi:schemaLocation="http://www.springframework.org/schema/beans 
          http://www.springframework.org/schema/beans/spring-beans.xsd
          http://www.springframework.org/schema/context
          http://www.springframework.org/schema/context/spring-context.xsd">
  <!-- acts as a template -->
  <bean id="baseEmpBean" abstract="true">
    <property name="company" value="XYZ"/>
  </bean> 
  <bean id="empBean" parent="baseEmpBean" class="com.knpcode.springproject.model.Employee">
    <property name="empId" value="1" />
    <property name="empName" value="Jack" />
    <property name="dept" value="HR" />
  </bean>
</beans>

That's all for the topic Spring Bean Definition Inheritance. If something is missing or you have something to share about the topic please write a comment.


You may also like